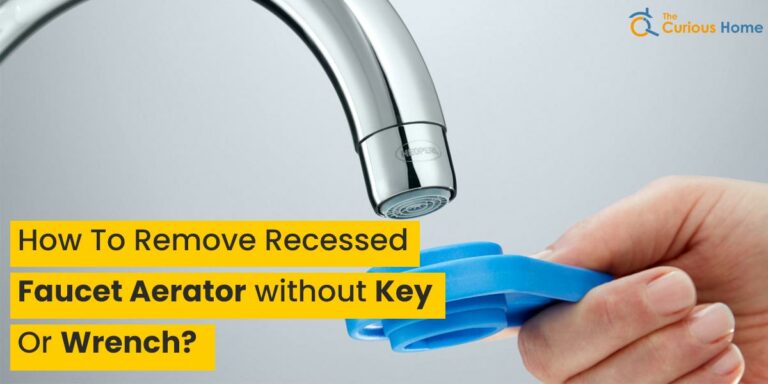
How to Remove Faucet Handle Without Screws
Are you having a hard time with changing or replacing your faucet cartridge or filter that’s malfunctioning? Or do you want to examine if there’s a leak? We got you! Even though the best faucet brands come with handles for providing support, a few of them do not contain screws on them due to aesthetic purposes. However, you should learn how to remove bathroom faucet handle that features no screws.
It can be difficult if you never did it before, in particular. But to manage the job, you don’t have to employ a plumber. Even a beginner may remove a kitchen faucet handle without any visible screws using a few widely accessible tools and easy instructions given below. Without further ado, let us get started on how to remove faucet handle without screws.
How to Remove a Bathroom Faucet Handle that Has No Screws
In case you have no idea about how to remove faucet handle without screws, follow the steps mentioned below.
1. Locate the Cap or Button
To find the cap or button, check around the faucet handle. You will normally find it on the top of the side.
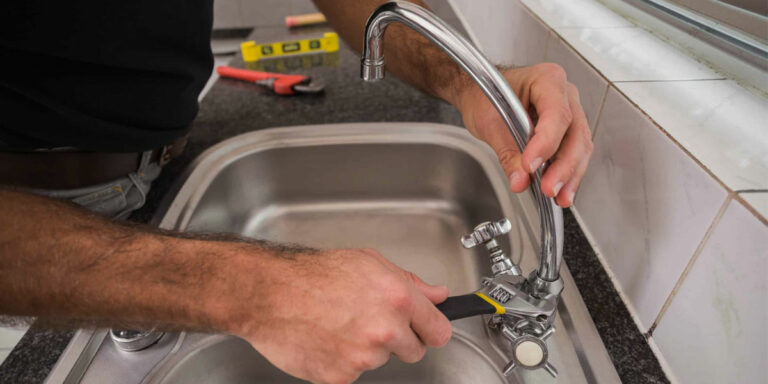
2. Use a Flat Screwdriver to Pop Out the Button or Cap
Insert the tiny flat screwdriver into the gap carefully and work around the edge slowly and carefully until it disengages or pops out. Remember that the majority of caps and handles are extremely delicate. They can easily break if they are not carefully handled. Fortunately, you can replace it from an online or nearest local shop.
3. Turn Off the Water Supply
This step is needed only at the time of changing the cartridge.
4. Remove the Screw
Remove the screw inside with a wrench once the cap or button popped out. You may first need to identify the size of the screw to have a suitable clamp for the job. Since screws are tiny and can pass through the drain channel, make sure that the drain is covered or closed before removing the screw so that it is not lost in case it falls into the drain.
5. Pull the Handle
Pull the handle out of the hose when the screw pops out. Try to use a pair of pliers or faucet pullers if you can’t do it with your hands. If used directly, the pliers might damage your handle by scratching it. It would be better to use an old towel or cloth to first wrap the handle’s base and then utilize the pliers.
6. Rinse Mineral Deposits
You might notice a few mineral deposits after removing the handle. You can easily get rid of these deposits by using lemon or vinegar.
How to Remove Double Faucet Handles without Screw
1. Turn Off the Water
For this process, it is a safety precaution to turn off the water under the sink.
2. Twist the Handle’s Base
Removing the faucet’s handle is easy and simple. All you need to do is hold its arm in place and rotate it counterclockwise.
3. Remove the Screw
Once you remove the faucet’s base, go ahead and take out the screws present inside. To do it, you need to hold the centerpiece present below and utilize a screwdriver to take out the screw.
4. Pull Out the Cartridge
You’ll notice a white cartridge underneath when the screw is removed. Use nosed needle pliers to remove it. Once you take it out, replace it with a new one. However, you might encounter some difficulties while removing cartridges using pliers.
How to Remove a Bathroom Sink Lever-Style Faucet Handle with No Screws or Cap
1. Remove the Button
The front side of the faucet’s handle consists of 2 different types of buttons: Cold and Hot. Carefully apply some pressure on the edge of the buttons with a flat head screwdriver. You have to be very gentle while handling or removing the buttons as they are extremely fragile. Being small in size, the buttons can easily go down the drain channel. Hence, make sure the drain is covered to avoid losing the buttons.
2. Remove the Allen Key
You will discover an Allen key once you remove the button. Hence, you would need an Allen wrench to take it out.
3. Pull off the Faucet Handle
Once you have removed your Allen key, the next thing to do is remove the handle from the sink bathroom. However, a few faucets may contain cartridges. In case your faucet has one, you will have to unscrew the top of the cartridge to expose it. If your facet does not have a cartridge, you will find the actual faucet where the water comes through after removing the Allen key.
4. Expose the Cartridge
In case your faucet contains a cartridge, (which will be the case if you own a high-end faucet) you will encounter a gold-colored piece after removing the Allen key. You can either use your hands or an old towel (tie it around the piece) and wrench to remove it. Utilizing a towel would be a wiser option as it can protect the gold-colored piece from any damage or scratch from the wrench.
Instead of separating an old cartridge and replacing the small bits, it is best if you can just purchase a new cartridge. When pulled apart, cartridges don’t operate well. It’s just for a little while if they do. Installing a new one is the only way out.
Conclusion
There are numerous reasons to remove the handle from your kitchen’s faucet, including the replacement of a faulty cartridge or filter, or the clearance of the faucets, or in the case of leaks. However, many people tend to have very little idea about how to remove faucet handle. This procedure may appear complex if you don’t know the type of kitchen faucet, or have never removed or repaired a faucet handle earlier. Nevertheless, you must be able to accomplish the task if you follow these instructions.